
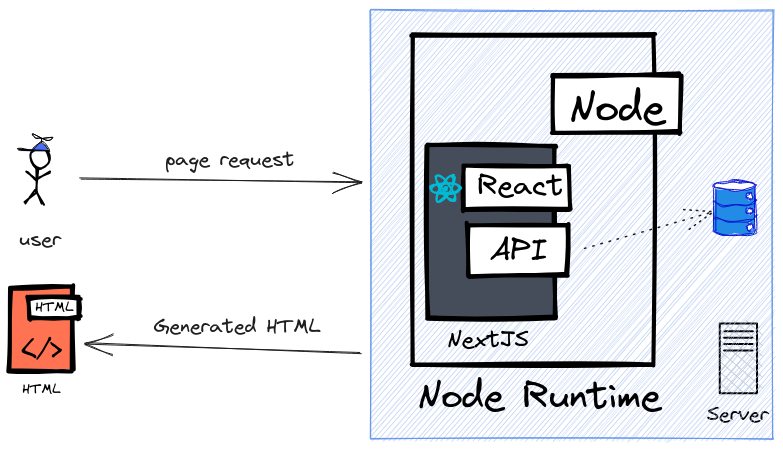
Next.js has gained significant popularity as a powerful framework for building modern web applications. Next.js is a JavaScript framework built on top of React, designed to simplify the development of server-rendered React applications. It combines the best features of React, such as component-based development and virtual DOM, with server-side rendering (SSR), static site generation (SSG), and automatic code splitting. Next.js provides a seamless development experience and optimizes application performance, making it an ideal choice for building production-ready web applications.
What is Next.js?
Next.js is a minimalistic yet highly extensible framework built on top of React. It combines the benefits of server-side rendering with the ease and flexibility of client-side rendering. Next.js provides a range of advanced features such as automatic code splitting, server-side rendering, static site generation, and API routes, making it an excellent choice for building performant and scalable web applications.
Key Features of Next.js:
Server-side Rendering (SSR): Next.js enables server-side rendering by default, which means that web pages are pre-rendered on the server before being sent to the client. This approach improves initial load times and ensures that search engines can crawl and index your pages effectively.
Static Site Generation (SSG): Next.js supports static site generation, allowing you to generate static HTML files at build time. This feature is especially useful for content-focused websites, blogs, or landing pages that don't require real-time data.
Automatic Code Splitting: With Next.js, you don't have to worry about manually optimizing your code for performance. It automatically splits your JavaScript bundles, ensuring that the client loads only the required code.
API Routes: Next.js provides an easy way to create serverless API endpoints. You can define API routes within your Next.js project, allowing you to handle server-side logic and data fetching seamlessly.
Getting Started with Next.js:
Now that we have a brief overview of Next.js, let's dive into getting started with Next.js and explore some practical examples.
Step 1: Setting up a Next.js project
To create a new Next.js project, you need to have Node.js installed on your machine. Open your terminal and run the following command:
npx create-next-app my-next-app
This command will create a new directory called my-next-app with a basic Next.js project structure.
Step 2: Explore the Project Structure
Next.js follows a convention-based project structure to ensure an organized development workflow. Some essential files and directories are:
pages/: Contains the application's pages. Each JavaScript or TypeScript file inside this directory represents a unique page.components/: Holds reusable components used across multiple pages.styles/: Houses global and component-specific CSS or Sass stylesheets.public/: Serves as the root directory for static files like images, fonts, etc.
Step 3: Creating pages
Next.js follows a file-based routing system. To create a new page, navigate to the pages directory and create a new JavaScript file. For example, let's create a simple about page:
// pages/about.js

const AboutPage = () => {
    return <h1>About Page</h1>;
};

export default AboutPage;
// pages/index.js

function HomePage() {
    return <h1>Welcome to Next.js!</h1>;
}

export default HomePage;
Save the file, and start development server and visit http://localhost:3000 in your browser, and you should see the message "Welcome to Next.js!" displayed on the page.
Step 4: Building Dynamic Pages
Next.js enables dynamic routing by allowing you to create pages with dynamic parameters. Let's create a dynamic page that displays a user's profile based on their ID.
Inside the pages/ directory, create a new file called [id].js with the following content:
function ProfilePage({user}) {
    return <h1>Profile Page: {user.name}</h1>;
}

export async function getServerSideProps({params}) {
    const res = await fetch(`https://api.example.com/users/${params.id}`);
    const user = await res.json();

    return {
        props: {
            user,
        },
    };
}

export default ProfilePage;
In this example, the getServerSideProps function is a Next.js function that runs on the server and fetches the user data based on the id parameter. The data is then passed as props to the ProfilePage component.
Step 5: Starting the development server
To start the development server, navigate to your project's root directory and run the following command:
npm run dev
This command will start the Next.js development server, and you can access your Next.js application by visiting http://localhost:3000 in your browser.
Step 6: Exploring advanced features
Next.js offers many powerful features that can enhance your development experience. Here are a few examples:
Server-side Rendering (SSR): Next.js performs server-side rendering automatically, but you can customize the data fetching process using the getServerSideProps function. This function allows you to fetch data from an external API or perform any server-side calculations before rendering the page.
Static Site Generation (SSG): To generate static HTML files at build time, you can use the getStaticProps function. This function enables you to fetch data from a database, CMS, or API during the build process and pass it as props to your page components.
API Routes: Next.js provides a straightforward way to create serverless API endpoints. You can create a new API route by creating a file in the pages/api directory. For example, let's create an API route to handle a simple user registration:
// pages/api/register.js

export default function handler(req, res) {
    if (req.method === 'POST') {
        // Handle the registration logic
        // ...
        res.status(200).json({message: 'Registration successful'});
    } else {
        res.status(405).json({message: 'Method Not Allowed'});
    }
}
You can then make a POST request to /api/register to register a new user.
Next.js offers much more than what we covered here, including features like static site generation, API routes, CSS modules, and more. It's a versatile framework that caters to various use cases and provides excellent performance out of the box.